Let’s get one thing straight: “professional-quality” foot photos don’t come from perfect feet. They come from consistency. The camera is basically a tiny, judgmental microscope that notices everything you didn’t—dry heel edges, sock lint, cuticles you forgot existed, polish chips that were “fine in real life,” and that one patch of skin that catches light like it’s auditioning for a spotlight.
This approach isn’t about turning foot care into a second job. It’s about building a simple system that makes your feet look clean, intentional, and premium on camera with minimal effort. When your baseline stays high, your prep stays easy. When your prep stays easy, you stay consistent. And consistency is what makes your photos look like you know what you’re doing.
So here’s the full package: a ten-minute “camera-ready” routine for shoot days, plus a foot care kit checklist that’s actually practical. No clutter. No gimmicks. No dramatic foot peeling disasters that leave you looking like a lizard mid-shed.
What “Camera-Ready” Feet Actually Means (and how not to Overdo It)
In Smart Girl terms, camera-ready is simple. Your skin looks hydrated but not greasy. Your heels look smooth and even, not freshly attacked. Your nails look tidy, shaped, and clean. Your overall look reads as deliberate, not accidental.
That’s the standard. It’s not “flawless.” It’s “finished.”
Now, two Smart Girl rules before we start.
First, don’t do anything intense right before you take photos. Anything aggressive: harsh peels, overly enthusiastic filing, or acids you’ve never tried, has a way of showing up as redness, irritation, weird texture, or patchy dryness. And then you’re stuck trying to edit your way out of it, which never looks as natural as you think it will.
Second, keep your tools clean. If you’re doing any kind of grooming, you’re dealing with skin and nails, and cleanliness matters. This is beauty routine territory, not medical advice, but if you have persistent cracking, pain, or nail issues, treat that like the grown-up you are and get proper help. The goal here is healthy-looking, not risky.
Foot care is important for great quality photos.
The 10-minute “camera-ready” routine
Minute one: clean and fully dry
Start with clean feet. Showered is ideal, but if not, warm water and a gentle soap is enough. The important part is drying properly, especially between toes. If you rush this step, the rest of your products won’t sit nicely, and any leftover moisture can turn into shine in the wrong places.
This is also the moment you do a quick visual check. Any sock fuzz? Any random speck stuck to your skin? Any polish chip that’s going to haunt you later? You’re not fixing everything yet, you’re just noticing what needs attention.
Minute two and three: soften, but don’t soak
You’re not trying to marinate your feet. Long soaks can make skin swell and look puffy, and they can make calluses temporarily softer in a way that encourages you to over-file. Instead, keep it simple. Run warm water over your feet for thirty seconds, or wrap each foot in a warm damp towel for a minute. This is just enough to soften the outer layer so you can smooth it gently.
If your feet already feel pretty soft, you can skip this entirely. Smart Girl rule: do less when you can.
Minute four and five: quick smoothing, targeted only
This is where you take a pumice stone or foot file and do a light pass on the heel edge and any obvious rough patches. Light pressure. Short time. The goal is even texture, not baby skin.
Over-filing is the fastest way to create angry, shiny, tender feet that look worse on camera. A little roughness can be made to look soft with hydration and good lighting. Redness and irritation? Not so much.
If you’re the type who gets thicker calluses, the best results come from gentle maintenance weekly, not a dramatic one-day “fix.” Think of it like hair. You don’t chop your bangs every morning. You maintain.
Minute six: nail tidy, the fast version
This step does more for the “professional” look than most people realize. Nails don’t need art. They need order. Trim or file so they’re even, smooth the edges so they don’t catch light weirdly, and clean underneath. If you have polish, decide what you’re doing and commit. Either touch up properly and add top coat, or remove it and go clean/natural. Half-chipped polish never reads “effortless.” It reads “I gave up.”
If you like a natural look, a simple shaping and a clean nail bed can look incredibly premium. That minimal “put together” vibe photographs beautifully.
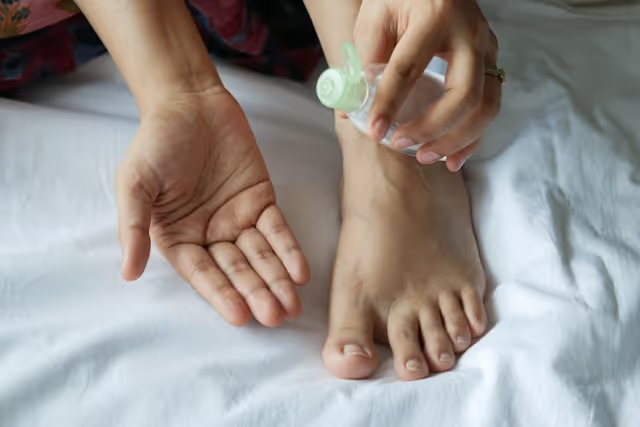
Minute seven and eight: moisturize strategically (this is the real cheat code)
Moisturizer is where most people accidentally ruin their photos. Not because moisturizer is bad, but because they use too much and they don’t let it settle.
Apply a rich cream to the heels, soles, and around the ankle. Keep it lighter between the toes. Then wait about twenty to thirty seconds so it can start absorbing, and do a gentle blot with a clean towel or tissue. This one move is the difference between hydrated skin and oily glare.
If you want a clean, editorial look, blot more and keep the finish closer to matte. If you want a soft glow, blot lightly and leave a whisper of sheen. Either can look professional. The key is making the finish intentional.
Minute nine: cuticle oil, but make it subtle
Cuticle oil is one of those tiny upgrades that makes your feet look “finished” on camera. Use a small amount around each nail and massage it in. Then wipe your fingertips and dab any excess so it doesn’t look greasy. You’re going for healthy, not shiny.
If you’re wearing polish, cuticle oil can make the whole nail area look smoother and more luxurious in photos. If you’re natural, it gives that clean, cared-for look that reads expensive.
Minute ten: the final pass (where Smart Girls win)
Now you do the annoying little details that separate “nice photo” from “professional.” Check for lint. If you wore socks, you almost definitely have fuzz hiding somewhere. A lint roller is great, but even a slightly damp cloth can lift it. Check for jewelry marks if you wear anklets or toe rings. If you’re going to wear them in the photo, make sure they’re clean and positioned deliberately. If you’re not wearing them, take them off early enough that they don’t leave dents.
Then look at your feet in the light you’ll be shooting in. Not bathroom lighting. Not your hallway. The actual light. If you see a hotspot of shine, blot again. If you see a dry patch, add the tiniest bit more cream to that spot, wait ten seconds, and blot.
Ten minutes. Done. You’re not exhausted. You didn’t destroy your skin. You’re ready.
The Smart Girl fixes for common “camera problems”

The camera can be cruel, but it's honest, and it can be your friend if you work with it.
If you’ve ever taken a photo and thought, “Why do my feet look worse than they did in real life?” welcome to photography.
If dry patches are showing, don’t panic and don’t start scrubbing. The smartest move is layering moisture lightly. Add a tiny amount of cream to the patch only, wait a moment, and blot. Repeat once if needed. This looks more natural than piling on product everywhere.
If redness shows up, stop exfoliating and keep everything gentle. Redness is stubborn on camera and even more stubborn in editing. Hydration and time are the fix, not more tools.
If your feet are too shiny, you used too much product or you didn’t blot. Blotting solves most shine. If you still get glare because of your lighting angle, change the angle first before adding more products. Light is often the issue, not your skin.
If polish looks uneven or chipped, do not try to “hide it” with angles. The camera will still notice. Either properly touch up and top coat, or remove it and go natural. Natural, tidy nails look extremely professional when the rest of the foot is cared for.
Your foot care kit checklist (what you actually need)
Now let’s talk about the kit, because a kit is what keeps your routine fast. When you have the right basics, you’re not improvising. You’re not using random tools from the bottom of a drawer. You’re not doing “emergency self-care” five minutes before photos.
Here’s the Smart Girl truth: you only need a handful of items, but they need to be the right ones.
Start with nail clippers and a good file. A glass file is a quiet little luxury that gives smoother edges than the scratchy cheap ones, and smooth edges look cleaner on camera. Clippers keep things even. The combination makes nails look tidy, whether you wear polish or not.
Add a simple foot file or pumice stone. This is your maintenance tool for heels and rough patches. You don’t need a terrifying electric grinder. You need something you can use gently and consistently. Consistency makes the texture even. Even texture photographs beautifully.
You need cuticle oil. Not ten oils, not a complicated ritual. One small bottle that lives in your kit and gets used regularly. It’s one of the fastest ways to make nails look cared for, and it helps prevent that dry, ragged cuticle look that cameras love to highlight.
You need a rich foot cream that actually does something. Look for ingredients that soften and hold water in the skin, not just perfume. Urea is a classic for rough heels. Glycerin and shea butter can also be great. The point is simple: your cream should leave your skin softer tomorrow, not just slippery today.
You also need a clean towel or microfiber cloth that belongs to the kit. This is your blotting tool, your quick clean-up, your “I want my finish to look intentional” helper. If you take nothing else from this article, take blotting. It’s the difference between “glowy” and “greasy.”
Finally, keep something for tool hygiene. Alcohol wipes or a simple spray are enough. Clean tools are part of a professional routine, full stop.
That core kit is the foundation. If you have those items, your ten-minute routine stays ten minutes.
The nice-to-haves (only if you’ll actually use them)
If you paint your nails regularly, toe separators can make your life easier. They’re not essential, but they prevent smudges and make polish look cleaner.
If your heels tend to get rough quickly, a gentle exfoliating lotion used on non-photo days can keep your baseline soft. The key is using it when you have time for your skin to settle, not right before you shoot.
A small buffer block can help if your nails are ridged and you want a smoother look, but go easy. Over-buffing can thin nails and make them more prone to damage, which is not the aesthetic.
A lint roller sounds silly until you realize how often sock fuzz ruins otherwise clean photos. It’s one of those low-cost items that quietly upgrades everything.
What’s gimmicky or risky
Anything that encourages you to go too far, too fast is a pass. Callus razors are a hard no because they can cause cuts and uneven texture. Aggressive peel masks right before photos are a no because they can leave you patchy and unpredictable. Overpowered grinders are a no because it’s easy to irritate your skin without realizing until later.
Also, be careful with shimmer sprays and heavy oils. They can look pretty in person, but on camera they often turn into glare and highlight texture in the worst way. If you want a glow, use cream, let it absorb, and blot. That glow looks expensive. Random shine looks accidental.
The maintenance plan that makes everything effortless
Here’s the part that makes you feel like a Smart Girl instead of someone constantly doing damage control: a simple rhythm.
If you do a tiny amount of foot cream after a shower a few times a week, your feet stay soft enough that you rarely need intense exfoliation. If you shape your nails once a week and use cuticle oil regularly, you don’t end up with ragged edges that need a full repair session.
Maintenance is what makes the ten-minute routine feel easy. The ten-minute routine is just the finishing touch.
If you want a clean baseline, pick one day a week for your “reset.” It doesn’t have to be a whole production. Light smoothing, nail tidy, cuticle oil, richer cream. That’s it. You’re not trying to become a spa. You’re trying to become consistent.
A final note about The Meaning of “professional”
Professional doesn’t mean complicated. Professional means repeatable. It means your photos have a consistent level of care, so they look intentional even when the styling is simple.
If you do the ten-minute routine and keep your kit tight, you’ll notice something: you’ll spend less time fixing problems, and more time taking photos that look clean, confident, and high quality.
That’s the whole point. Smart effort. Strong results.
Frequently Asked Questions
How often should I do the 10-minute camera-ready routine?
Use it anytime you’re about to shoot or want your feet looking polished on short notice. If your baseline care is consistent, you won’t need it daily. More like a quick “finishing pass” a few times a week.
What’s the best time to do this routine before taking photos?Give yourself 15–30 minutes if you can, so moisturizer has time to settle and you can blot any excess shine. If you’re in a rush, just keep product amounts light and blot well.
Why do my feet look shiny in photos even when they don’t in real life?Cameras exaggerate shine, especially with window light or overhead lighting. It’s usually too much product sitting on the skin. Let moisturizer absorb for a moment, then blot. If you still see glare, adjust your angle or move slightly farther from the light source.
Should I soak my feet before photos?A quick warm rinse or a short warm towel wrap is enough. Long soaks can make skin look puffy and can tempt you to over-file, which can cause redness or uneven texture that shows up on camera.
What should I avoid doing right before a shoot?Skip anything aggressive: strong peels, harsh scrubs, heavy filing, or trying a new product for the first time. Those can cause redness, sensitivity, or patchy texture that’s hard to fix quickly.
Are foot peeling masks worth it?
They can be useful for maintenance, but they’re not a “right before photos” solution. They can leave unpredictable peeling and texture for days. If you use them, schedule them well away from any planned photos.
Can I make my feet look “matte” instead of glowy or shiny?
Yes. Use less moisturizer, let it absorb, then blot more thoroughly. If you still get shine from lighting, change your angle or move farther from the light source. Often it’s the lighting, not your skin.
Pick
one funnel (Instagram, X, or Reddit) and
one store platform. Write your buying instructions, set your prices, and schedule your first two drops. Then repeat. Your goal isn’t to be everywhere, it’s to be reliably somewhere, with a product that feels intentional and easy to buy.
If you want my full toolkit: pricing matrix, content planner, caption formulas, DM scripts, boundary templates, and the exact weekly workflow, I bundled it all into my
step-by-step eBook. I promise it will help you get started with confidence and consistency.
→ Grab my foot selling eBook hereKeep It Simple, Keep It Consistent
Professional-looking foot photos don’t come from doing the most, they come from doing the right few things, reliably. When your baseline is solid (light weekly upkeep + a good cream), the “camera-ready” routine stays quick: smooth the obvious roughness, tidy the nails, hydrate strategically, and finish with a clean, intentional look.
Love,
The Smart Girl
%20(2400%20x%202400%20px)%20(1).png)


